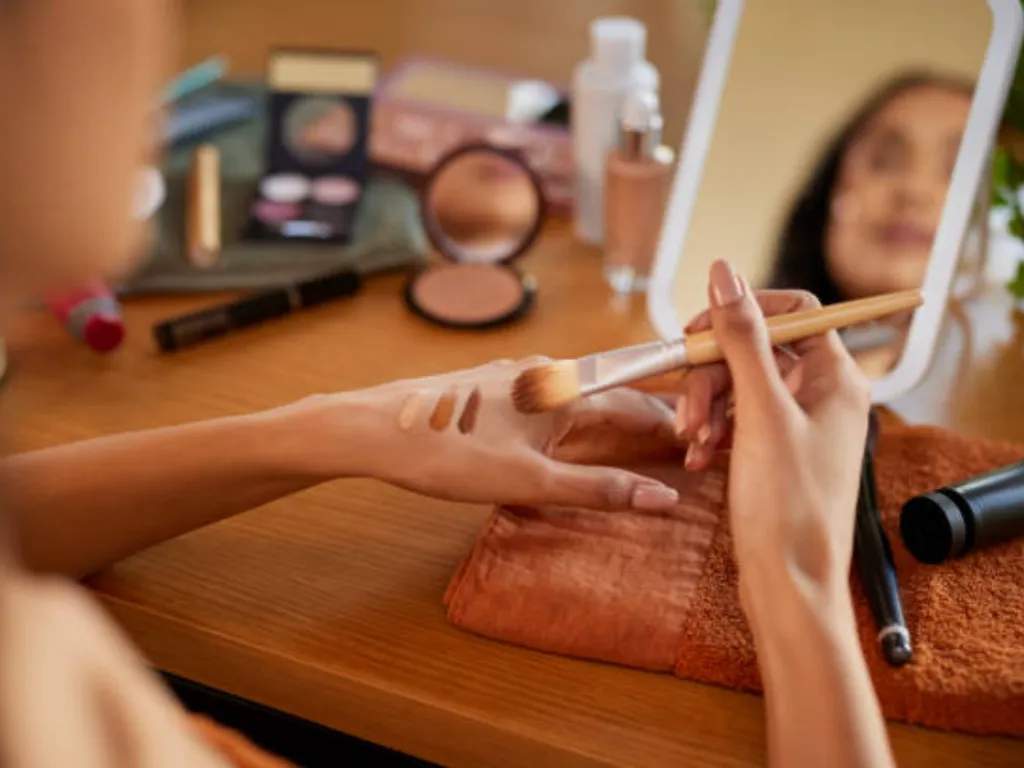


In der kosmetischen Kunst, Der Unterschied zwischen einem Amateur-Look und einem professionellen Finish liegt selten im Preis Lidschatten. Es ist die Technik des Mischens. Ein nahtloser Farbverlauf, bei dem die Farbe unmerklich in die Haut übergeht, ist das Markenzeichen von hochwertigem Make-up.
Jedoch, dies zu erreichen “Airbrush” Wirkung ist keine Zauberei. Es ist eine Frage der Physik, Geometrie, und mit den richtigen Instrumenten. Dieser Leitfaden analysiert den Mischprozess, um Ihnen zu helfen, die Werkzeuge und Mechanismen zu verstehen, die für eine einwandfreie Ausführung erforderlich sind.
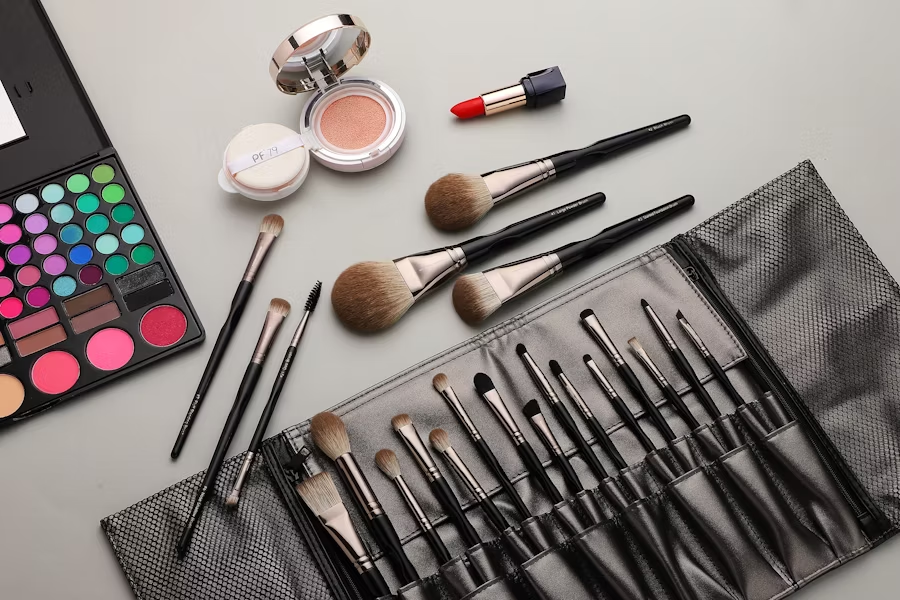
Auswahl der richtigen Werkzeuge zum Mischen

Mit einem einzigen Werkzeug können Sie keinen komplexen Augenaufschlag erzielen. Das Mischen besteht aus einer Reihe mechanischer Schritte: Ablagerung, Diffusion, und Definition. Für jeden Schritt ist ein Pinsel mit spezifischen Struktureigenschaften erforderlich.
Wenn Sie einen sauberen Farbverlauf wünschen, Ein kuratiertes Toolkit ist eine betriebliche Notwendigkeit.
Pinselfunktion & Design
PinseltypAm besten für wichtige StrukturmerkmaleFluffy BlenderÜbergangstöne & StreukantenKonische Kuppel, lange flexible BorstenFlacher ShaderPackende Farbe auf dem DeckelDicht, kurze Borsten, eingeklemmte ZwingeDetail/PencilOuter “V”, unteren Wimpernkranz, smudgeKlein, Firma, gespitzte Spitze
Der flauschige Mischpinsel (Konisch)
Dies ist der Motor des Gradienten. Die Borsten müssen lang und weich sein und eine sich verjüngende Kuppelform haben. Lange Borsten sind flexibler. Dadurch können sie über die Haut streichen, ohne sie zu ziehen. Setzen Sie die konische Spitze in die Augenhöhle ein und lassen Sie das Produkt durch die kürzeren umgebenden Borsten verteilen. Verwenden Sie dies nicht zum Auffüllen von Farbe. Verwenden Sie es für den Übergangsbereich, um harte Linien in einen sanften Schleier zu verwandeln.
Der flache Shader-Pinsel (Dicht)
Der Shader-Pinsel dient der Platzierung. Es verfügt über kürzere, dicht gepackte Borsten. Die Dichte ist erforderlich, um eine hohe Pigmentkonzentration aufzunehmen. Drücken Sie es auf das Augenlid. Wenn Sie versuchen, für diesen Schritt einen flauschigen Pinsel zu verwenden, das Pigment wird zerstreuen. Das Ergebnis wird eine durchsichtige und lückenhafte Abdeckung sein.
Der Detail- oder Bleistiftpinsel
Präzision ist die letzte Variable. Dieser Pinsel ist klein, bleistiftförmig, und deutlich fester als der Mixer. Benutze es für “äußeres V” und der untere Wimpernkranz. Sein Zweck besteht darin, Schatten in einem konzentrierten Bereich zu erzeugen. Wenn Sie dieses Tool überspringen, Dunkle Farben werden den Look überlagern. Dadurch wird der Farbverlauf zerstört und ein erzeugt “schlammig” Aussehen.
Griff und Druck beherrschen

Der Besitz der richtigen Werkzeuge ist nur der erste Schritt. Das zweite ist die Mechanik der Manipulation. Fleckiger Lidschatten wird oft durch ungleichmäßigen Druck verursacht, nicht die Pulverformel.
Wo man den Pinsel hält
Der Griff eines Make-up-Pinsels fungiert als Hebel. Ihre Griffposition bestimmt die auf die Haut ausgeübte Kraft.
- Für Sättigung (Hochdruck): Halten Sie die Bürste näher an der Zwinge (das Metallteil). Dadurch verkürzt sich der Hebel. Es verringert die Flexibilität und erhöht den direkten Druck. Verwenden Sie diese Position, um die Farbe dort auf das Lid zu packen, wo Sie Deckkraft wünschen.
- Zur Verbreitung (Niederdruck): Fassen Sie die Bürste ganz am Ende des Griffs an. Dadurch wird die Hebellänge maximiert. Dadurch streifen die Borsten kaum die Haut. Wenn Sie einen sanften Fade wünschen, Verwenden Sie dies “leichte Hand” Ansatz. Es bewegt Pigmentpartikel sanft, anstatt sie wegzuschrubben.
Wischer vs. Kreisförmig
Unterschiedliche Mischziele erfordern unterschiedliche Bewegungsmuster.BewegungstypTechnikbeschreibungHauptanwendungsfallScheibenwischerHorizontales Hin- und HerwischenErstellen des Übergangsfarbtons in der FalteKleine KreiseÜberlappend, Mikrokreisförmiges Polieren. Verwischt scharfe Linien zwischen zwei Farben
Schritt für Schritt: So verblenden Sie Lidschatten für ein professionelles Finish

Ein systematischer Ansatz eliminiert Rätselraten. Folgen Sie einer logischen Reihenfolge der Vorgänge – bauen Sie von den hellsten Strukturelementen bis zur dunkelsten Definition auf. Dies sorgt für Klarheit im Endergebnis.
- Vorbereitung und Grundierung
Pigment erfordert eine gleichmäßige Oberfläche. Augenlider enthalten natürliche Öle, die die Leistung verändern. Tragen Sie ein spezielles Auge auf Grundierung um eine klebrige Oberfläche zu erzeugen. Dann, Fixieren Sie die Grundierung mit einem knochenfarbenen Lidschatten oder einem durchscheinenden Puder. Dies sorgt für ein seidiges Gefühl “Beleg.” Wenn Sie dies tun, Nachfolgende Farben gleiten eher, als dass sie kleben bleiben.
- Der Übergangsschirm
Verwenden Sie einen flauschigen Mischpinsel. Tragen Sie einen matten Farbton, der etwas tiefer als Ihr natürlicher Hautton ist, in die Falte auf. Dieser Schritt ist der “Gerüst” des Augenblicks. Es überbrückt die Lücke zwischen der Haut und den dunkleren Farben.
- Die Struktur vertiefen
Wechseln Sie zu einem kleineren, Dichterer Mischpinsel. Tragen Sie einen mitteldunklen Farbton tiefer in der Lidfalte und im äußeren Drittel des Auges auf. Bauen Sie Dimension auf, ohne den Übergangsfarbton vollständig abzudecken. Der Farbverlauf funktioniert, wenn die hellere Farbe über der dunkleren sichtbar bleibt.
- Maßgeschneidert für Augenformen
Passen Sie Standardtechniken an Ihre spezifische Augengeometrie an.
- Kapuzenaugen: Das bewegliche Lid verschwindet bei geöffnetem Auge. Erstellen Sie eine “falsche Falte.” Schauen Sie mit offenen Augen geradeaus. Mischen Sie den Übergangsfarbton über die natürliche Falte auf den Stirnknochen. Dies hebt den Blick optisch hervor.
- Monolide: Möglicherweise verfügen Sie nicht über eine natürliche Steckdosenlinie. Wechseln Sie zu einem vertikalen Farbverlauf. Tragen Sie die dunkelste Farbe nahe am Wimpernkranz auf. Blenden Sie es nach oben zu einem mittleren Ton aus, und schließlich ein heller Ton in der Nähe der Braue. Das “Ombre” Wirkung schafft Tiefe.
- Tiefliegende Augen: Ihr Stirnknochen wirft einen natürlichen Schatten. Vermeiden Sie es, diese Dunkelheit zu verschlimmern. Halten Sie die dunkelsten Schatten unbedingt in der äußeren Ecke. Bringen Sie sie nicht zu hoch in die tiefe Falte. Konzentrieren Sie sich auf die Beleuchtung des Lids und des inneren Augenwinkels, um den Blick nach vorne zu richten.
- Das Finale “Sauber” Mischen Sobald alle Farben platziert sind, Machen Sie eine Reinigung, flauschiger Pinsel mit kein Produkt drauf. Führen Sie diesen Pinsel am Rand des Lidschattens entlang. Dieser letzte Polierschritt entfernt alle verbleibenden Härten.
Warum Ihr Lidschatten schlammig aussieht und wie Sie das beheben können
“Schlammig” Lidschatten entsteht, wenn Farben an Lebendigkeit verlieren und zu einem Ganzen verschmelzen, gräulicher Ton. Dies ist eine häufige Beschwerde. Oft liegt es an der Hardware selbst.
Die Rolle der Borstenqualität
Wenn Sie alle Schritte befolgen und trotzdem ein schlammiges Ergebnis erhalten, Überprüfen Sie die Borsten Ihrer Bürste. Minderwertige Synthetikbürsten haben oft glatte Oberflächen. Sie können das Pulver nicht gleichmäßig aufnehmen.
Hochleistungsbürsten, wie die von BS MALL hergestellten, Verwenden Sie fortschrittliche umweltfreundliche synthetische Fasern. Diese sind so konstruiert, dass sie die Schuppenstruktur von natürlichem Haar nachahmen. Diese Mikrotextur ermöglicht es dem Pinsel, das Puder aufzunehmen. Noch wichtiger, es gibt es langsam und gleichmäßig ab.
Wenn eine Bürste nach dem Waschen ausfällt oder ihre Form verliert, es kann nicht präzise verschmelzen. Wir verwenden eine proprietäre hochfeste Klebetechnologie. Wir führen auch strenge Feuchtigkeitstests durch. Dadurch wird sichergestellt, dass der Bürstenkopf auch nach jahrelangem Gebrauch seine präzise Form behält. Wenn ein Pinsel nach außen spreizt, es kann nicht verschmelzen; es kann nur schmieren.
Der Sauberkeitsfaktor
Mischen Sie eine helle Farbe nicht mit einem Pinsel, den Sie zuvor für einen dunklen Farbton verwendet haben. Rückstände vermischen sich mit dem neuen Pigment. Dadurch wird die Farbe sofort entsättigt. Reinigen Sie Ihre Pinsel regelmäßig gründlich. Verwenden “Farbschalter” Schwämmchen während der Anwendung, um die Farbtreue zu erhalten.
Warum ein komplettes Pinselset zum Mischen nicht verhandelbar ist
Es gibt ein Missverständnis, dass eine Single “Gut” Pinsel kann jede Funktion ausführen. Wenn Sie versuchen, mit einem Pinsel einen kompletten Augenaufschlag zu erzielen, Das Ergebnis wird suboptimal sein.
Die Notwendigkeit einer speziellen Geometrie
Ein normaler Augenaufschlag erfordert den Umgang mit mindestens drei verschiedenen Farbwerten (Licht, Medium, dunkel).
- Verhindern Sie Kreuzkontaminationen: Wenn Sie für die dunkle Außenecke und die helle Innenecke den gleichen Pinsel verwenden, Sie übertragen dunkle Pigmente auf den hellen Bereich. Dadurch wird der Kontrast zerstört. Mit einem Funktionsset können Sie bestimmte Pinsel bestimmten Farbfamilien zuordnen.
- Maßstab und Präzision: Eine große, flauschige Bürste kann keinen Schatten unter den unteren Wimpern auftragen, ohne dass ein Schatten entsteht “Waschbärenauge” Wirkung. Umgekehrt, Ein winziger Bleistiftpinsel kann einen Übergangsfarbton nicht verblenden, ohne Streifen zu hinterlassen.
Steigern Sie Ihre Schönheitsmarke mit professionellen Pinsellösungen
Für Inhaber und Einzelhändler von Kosmetikmarken, Die oben genannten Erkenntnisse stellen eine entscheidende Geschäftsrealität dar. Ihre Kunden’ Die Zufriedenheit hängt mit den von ihnen verwendeten Tools zusammen. Sie können den besten Lidschatten auf dem Markt formulieren. Jedoch, wenn Ihr Kunde es mit einem Kratzer aufträgt, schlecht geformter Pinsel, Das Ergebnis wird schlecht sein. Sie geben oft dem Lidschatten selbst die Schuld.
Strategische Fertigungspartnerschaft
Um den Ruf Ihrer Marke zu sichern, Sie müssen das Anwendungserlebnis kontrollieren. BS MALL gilt als erstklassiger Fertigungspartner. Wir sind eine integrierte Branchenlösung, die R. kombiniert&D, Design, und Großserienproduktion.
Warum mit BS MALL zusammenarbeiten??
- Skalierbare Anpassung (OEM/ODM): Wir führen präzise aus. Egal, ob Sie einen schnellen Start mit unserem benötigen “Private Label” Katalog oder ein maßgeschneidertes Design mit kundenspezifischen Formen.
- Produktionskapazität & Einhaltung: Wir operieren auf einer 3.000 m² großen Anlage mit einer Kapazität von 1.8 Millionen Einheiten. Wir unterstützen alles, von Startups bis hin zu globalen Einzelhandelsketten. Unsere Betriebe sind vollständig zertifiziert (BSCI, ISO9001). Dadurch wird sichergestellt, dass Ihre Marke den Sicherheitsstandards des amerikanischen und europäischen Marktes entspricht.
- Öko-Innovation: Der Markt verlagert sich in Richtung Nachhaltigkeit. Unsere Expertise im Bereich erneuerbarer Materialien positioniert Ihre Marke an der Spitze der umweltbewussten Bewegung.
Wenn Sie bereit sind, Ihren Kunden professionelle Werkzeuge zur Verfügung zu stellen, Kontakt BS MALL Heute. Lassen Sie uns Ihnen beim Aufbau einer Pinsellinie helfen, die Ihre Kunden von Neulingen in treue Fürsprecher verwandelt.